Check out the new MinnowBoard.org website for the most up-to-date information on the MinnowBoard Turbot and the MinnowBoard.org Community.
MinnowBoard MAX HW Setup

Contents
Provisioning
The MinnowBoard MAX ships without a power supply, connecting cables, storage devices, or an installed OS. So before getting started, gather the necessary hardware components.
Skill Level
The difficulty level of this project is:
- Absolute beginner
Hardware Components Needed
At a minimum you'll need:
- 5V 2.5A Power Supply
and either (A) an HDMI display and keyboard directly connected to the MinnowBoard MAX:
- 1920x1080 or larger monitor with an HDMI port (or HDMI adapter)
- HDMI cable (HDMI micro male to HDMI male, or whatever your monitor requires)
- USB keyboard

or (B) an FTDI cable and terminal emulation software (such as Tera Term on Windows*) on your development/host computer:
- 3.3v FTDI serial cable with a 6-pin or 4-pin connector
- Terminal emulation software, configured with Baud rate: 115200, Hardware Flow Control: No, Bits: 8, and Stop: 1.
Note: The serial port only works for text-based console input and output; it cannot support graphical user interface capabilities such as a mouse or graphics display. (Setting up your MinnowBoard MAX with both HDMI output and USB keyboard input, and with the FTDI serial-port connection can be useful for debugging.)
Note: If you use the FTDI serial connection, you'll likely need to install FTDI drivers for your development/host computer from here: http://www.ftdichip.com/FTDrivers.htm (Drivers are available for Windows, Linux, and Mac).
You'll also need some storage devices for updating the board's firmware, or (eventually) for holding the board's OS image and filesystem:
- USB thumb drive (2GB or larger), FAT32-formatted
- Micro-SDHC card (16GB or larger)
You may find it convenient to have these items available too:
- USB hub (non-powered), for connecting additional devices
- USB mouse (should you install an OS with a graphical user interface)
- Network cable (and network connection)
Software Libraries / Dependencies
Minnowboard Max comes with UEFI (Unified Extensible Firmware Interface) firmware installed. UEFI is a standard firmware interface for PCs, designed to replace the BIOS (Basic Input/Output System), to improve software interoperability and to address legacy support limitations of BIOS.
Before working with the Minnowboard MAX and installing an OS, check the firmware version on your board. If it's not the most current one available, download and update the firmware. Intel's firmware website has pre-built 32-bit and 64-bit binary images ready for download and installation. Version 0.82 is the latest release as of July 31, 2015). Note that version 0.82 is synonymous with version 0082.
MinnowBoardMAX Firmware

Here's how to set up your MinnowBoard MAX and check the firmware version it's running:
- Connect the monitor cable (HDMI-micro male to HDMI male) to a 1920x1080 or larger monitor and the MinnowBoard MAX, or use the FTDI serial cable as described above, and run your terminal emulation software.
- Connect a USB keyboard to the MinnowBoard MAX USB2.0 connector (top USB port). If you're using the FTDI cable to communicate with the MinnowBoard MAX, no USB keyboard is required.
- Connect the power cable to the MinnowBoard MAX and power the board up.
- Enter the MinnowBoard MAX UEFI boot option screen by following these steps:
- Wait a few seconds for the message Start boot option to appear at the bottom of the screen.
- Press F2 or <DEL> (within 5 seconds) to enter the boot options screen. Note: If you wait too long, you might end up entering the EFI shell and be staring at a Shell> prompt. If this happens, enter the exit command to get back to the boot manager screen.
- At the top of the screen, the firmware bit support (e.g., X64) and firmware version number (e.g., 0078) are displayed. You'll also see if an R for Release (as shown below) or D for Debug version of firmware is installed:
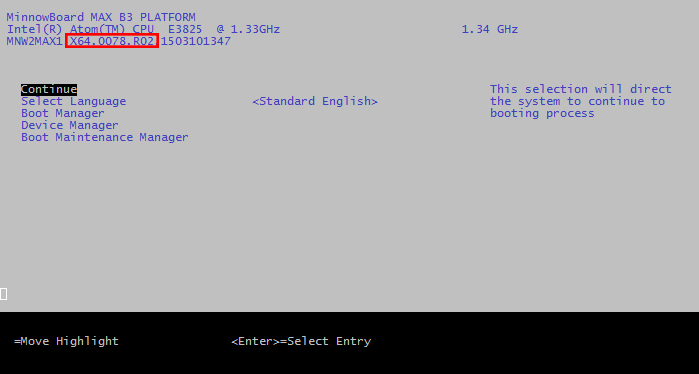
If your firmware version number is lower than what you found on Intel's firmware website, we recommend that you update the board's firmware. In the screenshot above, the 00078 was the latest firmware version available at the time) The rest of the version string displayed is the Year-Month-Day-Hours-Minutes of the build.

Updating Firmware Using a USB Thumb drive
The MinnowBoard MAX ships with 64-bit firmware support. UEFI requires the firmware and operating system loader (or kernel) be size-matched; a 64-bit UEFI firmware implementation can only load a 64-bit UEFI operating system boot loader or kernel. When updating the firmware, you may change the bit support if your application requires it.
To update the firmware of the MinnowBoard MAX, do the following:
- Download the firmware update zip-file package to your host computer from http://firmware.intel.com/projects/minnowboard-max. Be sure to choose the latest release version available for the bit support size you need ("Pre-built BIOS Firmware Binary images, 64-bit, Release" is recommended), unless advised otherwise. The Debug version provide additional tools that aren't required for normal operation.
- On your computer, unzip the archive and copy the folder to a FAT32-formatted USB thumb drive.
- Eject/Remove the USB thumb drive from the PC and insert it into an available USB port on your MinnowBoard MAX. (If you have an SDHC card installed in the MinnowBoard MAX, we recommend you remove it.)
- Cycle power to the MinnowBoard MAX. After a few seconds, you'll see the UEFI shell and a map display of the storage devices found. If your display looks like this:
  EFI Shell version 2.40 [1.0]
  Current running mode 1.1.2
  map: Cannot find required map name.

  Press ESC in 1 seconds to skip startup.nsh, any other key to continue.
  Shell>
it means no storage devices were found (for example, you didn't plug in the USB thumb drive containing the firmware update file). You can plug the USB thumb drive in now and use the map -u command to update the device handle mappings, and then proceed with the next step.
- Note: If the USB drive is the only storage device plugged in (and it should be at this point), then it will be device fs0 and you'll see something like this displayed:
 EFI Shell version 2.40 [1.0]
 Current running mode 1.1.2
 Device mapping table
   fs0     :Removable HardDisk - Alias hd15a0b blk0
            PciRoot(0x0)/Pci(0x14,0x0)/USB(0x0,0x0)/HD(1,MBR,0x3CAE3447,0x800,0x1DD0000)
   blk0    :Removable HardDisk - Alias hd15a0b fs0
            PciRoot(0x0)/Pci(0x14,0x0)/USB(0x0,0x0)/HD(1,MBR,0x3CAE3447,0x800,0x1DD0000)
   blk1    :Removable BlockDevice - Alias (null)
            PciRoot(0x0)/Pci(0x14,0x0)/USB(0x0,0x0)

 Press ESC in 3 seconds to skip startup.nsh, any other key to continue.
 Shell>
- If you don't get to this EFI shell prompt directly, use these steps:
- Cycle power to the board again and wait for the message “Start boot option” .
- Press F2 or <DEL> (within 5 seconds) to enter the UEFI boot menu options.
- Press Up/Down-Arrow to Select Boot Manager and Press Enter.
- Press Up/Down-Arrow to Select EFI Internal Shell and Press Enter. After a few seconds, you'll see the UEFI shell as show above.
- At the prompt, enter the value for the USB thumb drive followed by a colon (probably fs0:) and press Enter.
Shell> fs0:
(Note: If you get an error saying 'fs0' is not recognized as an internal or external command, check that you included the trailing colon when you typed fs0:.)
- Navigate to the directory on the USB thumb drive that contains the firmware update (where you did the unzip) using the cd command to change directory and the ls command to show files in the current directory. (Use the help -b command to see all available UEFI shell commands, paused one screen at a time.)
 Shell> fs0:

 fs0:\> ls
  Directory of: fs0:\

   03/09/15  11:05p            8,388,608  MinnowBoard.MAX.I32.078.R02.bin
   03/09/15  10:53p            8,388,608  MinnowBoard.MAX.X64.078.R02.bin
   08/14/14  07:54p               23,040  MinnowBoard.MAX.FirmwareUpdateX64.efi
   08/14/14  08:11p               14,144  MinnowBoard.MAX.FirmwareUpdateIA32.efi
   03/18/15  03:17p               10,049  MinnowBoard.MAX.0.78.BIN-ReleaseNotes.txt
           5 File(s)   16,824,448 bytes
           0 Dir(s)
- Run the appropriate UEFI installer (the .efi program) and specify the firmware image to load (the .bin file), depending on the current firmware of your MinnowBoardMAX. If your MinnowBoard MAX is currently running 64-bit firmware use the MinnowBoard.MAX.FirmwareUpdateX64.efi installer program (as shown below), and if you're currently running 32-bit firmware use the MinnowBoard.MAX.FirmwareUpdateIA32.efi installer program.
Note: With the UEFI shell, you can use the <TAB> key for command and filename completion.
 fs0:\> MinnowBoard.MAX.FirmwareUpdateX64.efi MinnowBoard.MAX.X64.078.R02.bin
 Intel(R) UDK2014 Firmware Update Utility for the Intel(R) Server Board S1200V3RPS
 Version 0.97
 Copyright(c) Intel Corporation 2006 - 2014

 Reading file MinnowBoard.MAX.X64.078.R02.bin

 Updating Firmware.  This may take a few minutes.
 .............................................................................................................
 .............................................................................................................
 .............................................................................................................
 .............................................................................................................
 .............................................................................................................
 .............................................................................................................
 ..................................................................................
 Update successful
 Shutdown system in 5 seconds ...
- When the update is complete, the board shuts off.
- Cycle power to the board and confirm that the firmware has been updated and you're ready to move on!
Next Steps
Now that the MinnowBoard MAX is booting and you've got the latest UEFI firmware installed, the next step is likely bringing up an OS. Before doing that though, you can use the UEFI shell to explore the MinnowBoard MAX hardware a bit. Use the help -b command to see all the UEFI Shell Commands, (displayed one page at a time), and learn more about a specific command by using, for example, help -b map. Check out the devices managed by the EFI drivers by using the devices -b command. Since the MinnowBoard MAX doesn't have a RTC battery (though you can add one), you can set the system date by using the command: date 3/31/2015.
Check out the Linux page or one of the other operating system wiki pages to learn how to install an OS on the MinnowBoard MAX.