Check out the new MinnowBoard.org website for the most up-to-date information on the MinnowBoard Turbot and the MinnowBoard.org Community.
Linux
The general process of setting up Linux for the MinnowBoard MAX is quite similar to setting up Linux on any other computer:
- Download the Linux distro to your host/development computer
- Make a bootable installer USB flash drive
- Plug the USB flash drive on the MinnowBoard MAX
- Attach the storage device on the MinnowBoard Max where you'll be installing the OS: a SATA HDD (connected to the SATA data port, and externally powered), a USB HDD (connected to the USB port), or a MicroSD card (connected to MicroSD card slot). Note that the installation works best when the destination drive is freshly formatted. Unformatted drives or drives with another OS installed can create installation issues.
- Power on the board and select the USB flash drive as the boot device and install the OS
However, there are a few things to keep in mind:
- MicroSD cards are frequently quite slow and may result in poor performance if you install an operating system on them.
- All flash memory devices have a limited number of writes; take care when using flash memory, particularly for SWAP as they can incur a lot of writes in a short period of time, ultimately leading to flash failure
- Installing FROM USB storage TO USB storage can be problematic; you may need to first run a "live image" on the MinnowBoard MAX and then install from the running live image
- You may need to adjust the boot loader config after installation to properly boot directly to the installed image
- Some things (such as spi/spidev, i2c and gpios) may not work with stock distro kernels. You may need to upgrade kernel versions after installing to get the kernel support you need, or even take the time to build your own kernel distro. (More on that later).
- The MinnowBoard MAX ships with 64-bit UEFI Firmware installed. UEFI can only work when the OS and Firmware are bit-support matched: you can't run a 32-bit OS from 64-bit firmware, and vice versa. What this means practically is that you may need to update the UEFI firmware to match the bit-support provided by your OS. Read the MinnowBoard MAX HW Setup page for steps to do this.
As shipped, the stock linux distribution you install may not come configured with the necessary kernel support for devices you'd like to use on the MinnowBoard MAX: GPIO, I2C and SPI access for example. You'll likely need to either upgrade the kernel or even configure and build your own kernel or distribution to get the features you'd like tailored to the environment you need.
Contents
Yocto Project
The Yocto Project is an open source project providing tools, processes, templates and methods for embedded linux developers to cross-compile and create a customized linux distribution tailored to their system needs. The MinnowBoard MAX is supported by the Yocto Project and the meta-intel intel-corei7-64 (for 64-bit support) and intel-core2-32 (for 32-bit support) Board Support Packages.
Building a Yocto Project Distribution for MinnowBoard MAX
We've created a separate page with more information about using the Yocto Project to create a linux distribution for the MinnowBoard MAX where you can read more about downloading a pre-built image and how to create a custom linux image in the MinnowBoard MAX Yocto Project page.
Ubuntu LTS 14.04 Desktop Installation
The current "Long Term Support" (LTS) release of Ubuntu (14.04) and the latest version (14.10) for desktop PCs have the same installation process.
You will need:
- A USB thumb drive (2GB or larger)
- A way to write an ISO bootable file to the USB thumb drive (a normal file-copy doesn't work). For example, you can use UNetBootin from http://unetbootin.sourceforge.net/ that let's you create bootable media on a Windows, Linux, or Mac OS X system. An alternative tool for Windows systems, and instructions on its use can be found here: https://wiki.ubuntu.com/Win32DiskImager
Download the Ubuntu Distro Image
- On your host/development computer, download the 64-bit ISO image from the Ubuntu desktop site. If you choose to use the 32-bit release, you'll also need to change to the 32-bit UEFI firmware on your MinnowBoard MAX to match the OS bit-support size before installing Ubuntu. For this example, we're using the 14.04.1 LTS 64-bit Desktop download.
Prepare and Write the Distro Image to the USB drive
- Format the USB drive as FAT32
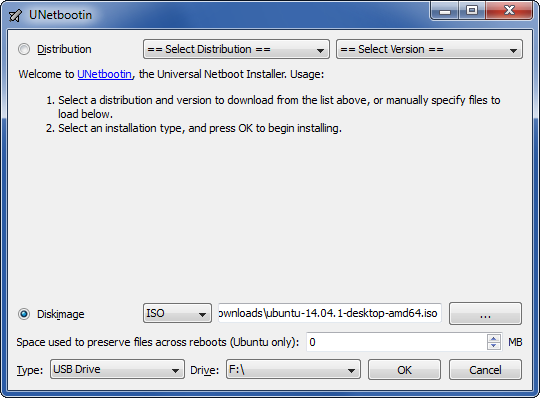
- Run UNetbootin, select the Disk Image radio button and ISO selector and find the ubuntu-14.04.1-desktop-amd64.iso file you downloaded from the Ubuntu desktop download site.
- Select the drive type and drive letter for your USB memory stick, and press OK. Double check you've selected the right drive to write to since all contents on this drive will be overwritten.
- After a few minutes, once the copy is finished click Exit (no need to reboot), eject/unmount the USB memory stick, and remove it from your host computer.

Serial only Installs
Ubuntu does not seem to handle dealing with a serial only install out of the box. You may need to follow some additional instructions to get an install going via serial only, you can take a look at https://github.com/ynkjm/ubuntu-serial-install which seems to have some good instructions for how to accomplish this.
Boot the Image on your MinnowBoard MAX
You'll need:
- A USB keyboard and mouse, connected to a (non-powered) USB hub
- An HDMI monitor connected to the micro-HDMI connector (the install can't be completed with only a serial connection)
- The USB thumb drive containing the Ubuntu image from the previous step
- A destination drive for the install, such as an SDHD card, another USB thumb drive, a USB HDD, a mSATA SSD (attached via a SilverJaw Lure), or an externally powered SATA drive (since the MinnowBoard MAX only has the SATA data connector). Whichever you use should be FAT32 formatted and empty.
Continue with these steps:
- With the MinnowBoard MAX powered off, connect the USB hub to the USB2 port and plug the USB mouse and keyboard into the hub
- Insert the USB thumb drive with the Ubuntu distro in the USB3 port (or hub)
- Insert the SDHC card or connect the formatted SATA drive where Ubuntu will be installed (if you're installing to another USB thumb drive or USB HDD, you'll connect the destination drive later in the process as noted below)
- Power up the MinnowBoard MAX
Booting from the installer flash drive
If you press F2 or ESC while booting, you'll end up in the boot manager menu where you can use the arrow keys and enter to select the Boot Manager option. From there, you can select the Boot option: 
Since the Ubuntu distro is on the USB thumbdrive, use the arrow keys to select EFI USB Device, press enter, and you'll proceed to the Ubuntu boot screen.
If instead you get an EFI shell, you can type exit to get back to the boot manager, or use the following commands to get the installer booting:
    fs0:
    EFI\boot\grubx64.efi
However, depending on the boot order setup of your MinnowBoard MAX, you may not get an EFI shell at all.
If you're installing Ubuntu to a USB flash drive or USB HDD, at the Ubuntu bootloader menu, select "try Ubuntu without installing." You should wait to plug in your installation target drive until after the Ubuntu live environment has finished booting.
If you're installing Ubuntu to a SATA drive or MicroSD card, you should have the drive or card plugged in before you power on the MinnowBoard MAX. If the destination drive already has an OS on it that you want to replace, you may have to change your boot order in the MinnowBoard MAX's legacy BIOS menu. (It's best if your destination drive is empty and formatted to avoid these problems.) Since it's plugged in when the MinnowBoard MAX is powered on, the SATA drive or SD card may get picked up by the EFI firmware prior to your installer USB. Depending on what partitions are already on the installation target, the installer USB may get detected as something other than fs0; for example, fs1 or fs2. Adjust your EFI shell commands accordingly. A list of detected partitions should be displayed when the EFI shell is initialized. Look for the one that says "USB," and that will likely be your installer.
Installing Ubuntu
At this point you see the Ubuntu installation options as shown by GNU GRUB (and as you'd see for installing Ubuntu on PC). Use the arrow keys and enter to select Install Ubuntu. Wait a few moments and the Ubuntu logo will appear along with some progress dots, followed by the Ubuntu Install welcome screen. Follow the instructions for selecting Language, ignoring the warning if you're not connected to the internet.
Alternatively, you can choose the Try ubuntu without installing option. This will bring up ubuntu's live image off the USB thumbdrive and let you experiment with the ubuntu interface without actually installing it. If you make any system changes or install software, you'll update the live image on the memory stick and it will be saved there if you boot the system again and choose the Try ubuntu without installing option. This is actually a handy way to bring up ubuntu on the MinnowBoard MAX, make system changes such as configuring a network proxy, and then continuing the install process from this live image onto the destination drive.
Note: Ubuntu 14.04.1 automatic installer has problems dealing with systems with any pre-existing partitions, multiple drives, or with drives with an OS already installed. You may have to do a manual partition of your destination drive as documented here: http://askubuntu.com/questions/343268/how-to-use-manual-partitioning-during-installation or use the 14.10 release instead. (Again, best to use a cleanly formatted destination drive rather than one with a previous OS installed.)
During the installation, Ubuntu will attept to retrieve additional packages from the internet. If you're not connected (or are behind a firewall) this will stall the installation. Click on the "Skip" button to get past this, and you can complete installation and OS upgrades once you have an internet connection (or have network proxy configuration set up). (See the note above about using the Try ubuntu without installing option to work around this problem.)
Upgrading the Kernel
As shipped, Ubuntu may not come configured with the necessary kernel support for GPIO, I2C and SPI access. You *could* learn how to compile your own kernel for ubuntu, or use a Yocto project build (see the next section), or you can follow the instructions here to simply upgrade the Ubuntu kernel to 3.19 that has inproved GPIO and SPI support enabled. Note that there are separate binary packages for 32-bit and 64-bit installations so pick the right one (likely you're using the 64-bit installation). The Linux kernel version 3.18 was the first to have GPIO support enabled.
http://ubuntuhandbook.org/index.php/2015/02/upgrade-linux-kernel-3-19-ubuntu-14-04/
Note: You can see which kernel version you're running by opening up a terminal window and use the uname -a command. The ubuntu 14.04 LTS distro uses the 3.16 kernel. You can read kernel release notes to learn more about what a particular kernel supports as well: for example, Linux kernel 3.19 Release notes.
Linux Mint 17 "Rebecca" 64-bit
We recommend you use the 64-bit release of MATE or XFCE edition of Linux Mint: Both MATE and XFCE have been tested and found to be very responsive and snappy on the hardware. Download the Linux Mint image, install it on a USB drive, plug the USB drive into the MinnowBoard MAX, and install, as explained in the previous section for Ubuntu.
It's strongly recommended upgrading to a new kernel (3.14 or newer) after installation. Instructions for doing this can be found here
Fedora 21 Workstation (x86-64)
To create a bootable live image USB installer drive for Fedora, instead of using a 3rd-party tool like Unetbootin, you should use one of the direct write methods listed here: https://fedoraproject.org/wiki/How_to_create_and_use_Live_USB#quickstarts
Once you have a bootable USB drive with the Fedora 64-bit image, plug the USB drive into the MinnowBoard MAX, and install the linux release, as explained in the previous section for Ubuntu.
You may also want to install a different desktop than GNOME 3, as gnome-shell is somewhat unresponsive on the MinnowBoard MAX.