Check out the new MinnowBoard.org website for the most up-to-date information on the MinnowBoard Turbot and the MinnowBoard.org Community.
Projects/Maker charLCD
Contents
Overview for Char LCD
Many projects are fully capable of running "headless"; that is, they'll work without a direct keyboard and display connection to the MinnowBoard. However, there are many instances where you might want to have a display, even a basic one, to display information.
We'll be working with a 16x2 character LCD display through the MinnowBoard GPIO interface to make running headless a bit easier. It may seem like a complex setup, but most of the inner workings of these devices are abstracted away, allowing us to focus on working with the MinnowBoard.
Skill Level
Hardware
Hardware Components Needed
- 8 Male-to-Male cables
- 8 Male-to-Female cables
- 1 potentiometer (a small / simple one will work fine)
- 1 16x2 char LCD display
- 1 MinnowBoard MAX with
mraaavailable - 1 breadboard
Hardware Overview
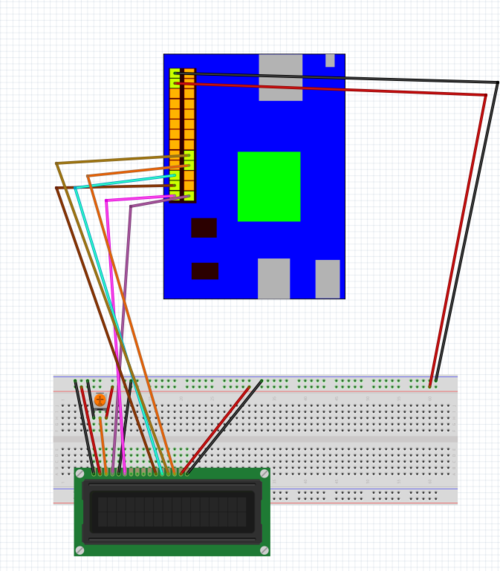
The connections to the MinnowBoard MAX from the device are the following by default:
- Ground --> LCD pin 1
- 5V --> LCD pin 2
- Potentiometer analog signal out --> LCD pin 3
- MinnowBoard GPIO pin 26 --> LCD pin 4
- Ground --> LCD pin 5
- MinnowBoard GPIO pin 25 --> LCD pin 6
- MinnowBoard GPIO pin 23 --> LCD pin 11
- MinnowBoard GPIO pin 21 --> LCD pin 12
- MinnowBoard GPIO pin 18 --> LCD pin 13
- MinnowBoard GPIO pin 20 --> LCD pin 14
- 5V --> LCD pin 15
- Ground --> LCD pin 16
It will look something like this with all defaults:

Try adjusting the potentiometer to change the gamma on the display until you can see a row of white boxes on the top row of the display.
Details
The pins for power, ground, and the potentiometer should be self-explanatory. The additional pins are used for the following purposes:
- LCD pin 4: Register select - This pin determines what we're passing to the character display. If it's set to LOW, the instruction register is selected for writing flags such as ones to clear the display and set the starting location. If it's set to HIGH, the data register is selected for reading and writing data to the display itself.
- LCD pin 6: Enable - This pin needs to be set to HIGH before we can read or write data.
- LCD pins 7 through 14: Data - These pins are the 8-bit bi-directional data bus we write the data to. However, we only use 4 of them to preserve pins on the MinnowBoard. We can do this by writing the first 4 bits normally, writing a set of zeros, and then writing the next set.
Software Libraries / Dependencies
# Get the libraries we need
from ada_lcd import *
import mraa

# Initialize the LCD
lcd = ADA_LCD()

# Clear the screen
lcd.clear()

# Write a message
lcd.message("Hello!")
Advanced Application
A useful thing we can do with this display is output some important system information. Here, we'll output the current date and time along with the MinnowBoard's current IP:
  # Get all the libraries we need
   from ada_lcd import *
   from subprocess import *
   from time import sleep, strftime
   from datetime import datetime

  # Create an instance of the LCD display
   lcd = ADA_LCD()

  # This complicated command will do a few things:
  # 1) Get the network information for the network interface eth0
  # 2) Find the lines where inet information is present
  # 3) Delete everything but the second element of each line
  # 4) Cut everything after the '/' character
  # 5) Edit the stream so that only the first line is left
   cmd = "ip addr show eth0 | grep inet | awk '{print $2}' | cut -d/ -f1 | sed -n '1,1p'"

  # This function uses the Python subprocess module to run our command
   def run_cmd(cmd):
     p = Popen(cmd, shell=True, stdout=PIPE)
     output = p.communicate()[0]
   return output

  # In this infinite loop, run the command and update each second
   while 1:
    lcd.clear()
  # Get the address right now
    ipaddr = run_cmd(cmd)
  # Using some Python functions, we'll get the current data and time,
  # making sure to have the '\n' at the end to go to the next line
    lcd.message(datetime.now().strftime('%b %d %H:%M:%S\n'))
  # On the second line, print our current IP
    lcd.message('IP: %s' % (ipaddr))
    sleep(1)
Code
Eventually!